Working as an affiliate
It suddenly happened — you were invited as an affiliate to work with AlterCPA Moe. You have received a completely standard message from the merchant, and we are going to tell you what you should do with this message and how to understand it.
Quick start
In that magical message that you received, there is an equally magical link to enter your personal account. Following this link, you will find yourself inside your personal online office. It is not necessary to use this link every time to enter, you can set your username and password.
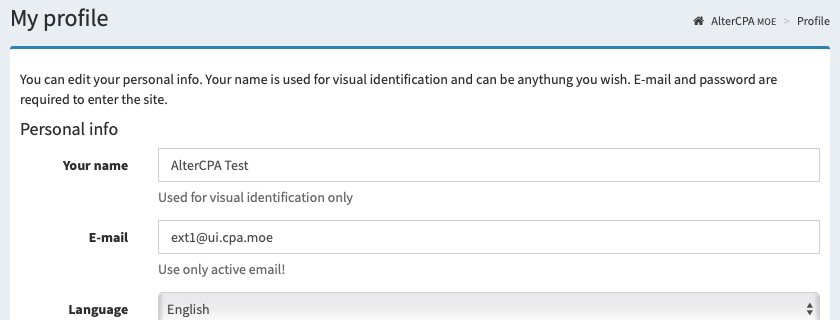
Your email address serves as your login. It must be unique for each account. If you work with multiple companies, it's best to keep the default value or ensure that email addresses are unique.
You have three options for the delivery of traffic, let's talk about each of them:
- Sending leads via API: classic options for affiliate networks.
- Sending leads via site form: optimal for simple affiliates.
- Sending leads manually: ideal for tests or direct communication with the customer.
Offers
Start your work by clicking this button. This section contains all the merchant's offers available to you. Here you can see the offer ID, its name and the list of countries the offer works with. There are also some useful buttons for manually adding a lead and downloading a ready-made API file for a form.
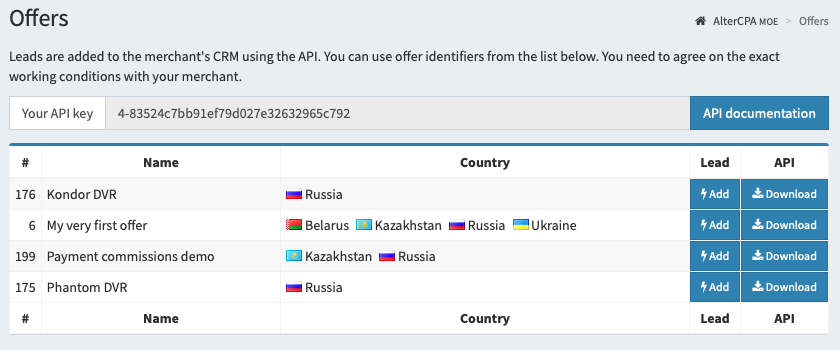
Important! You should check with your merchant directly for any details on working methods, permitted traffic sources, additional fields or identifiers of attached items.
Leads
Here all the leads you send to the merchant will appear. If for some reason the lead did not appear in this section, then the merchant did not receive it. Leads cannot disappear from this section.
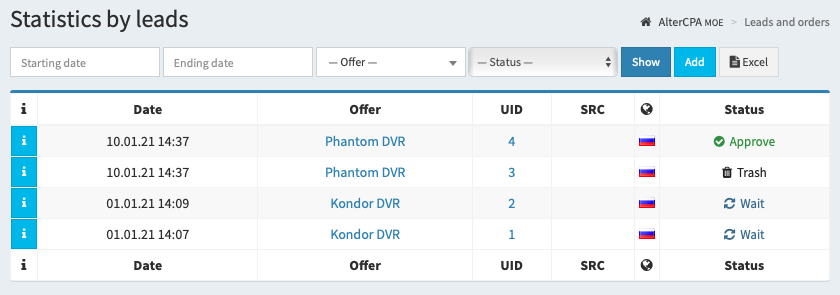
The main table contains a summary of your leads:
- The date lead was received by the system
- Offer the lead belongs to
- UID: lead ID on your side
- SRC: affiliate ID or traffic source on your side
- Lead country
- Current lead status (processing, hold, approved, canceled or trash)
If you click on the blue [i] button next to the lead, extended information about the lead will open. There will be indicated the IP address of the lead arrival, the reason for cancelling leads, UTM tags with filtering options. The list of leads can be downloaded to Excel using the corresponding button.
Sending leads manually
The form for manual sending of leads can be opened from the "Offers" or "Leads" sections by clicking the "Add" button. In it, you can immediately see all the nested goods available for the offer with their prices, custom and basic fields.
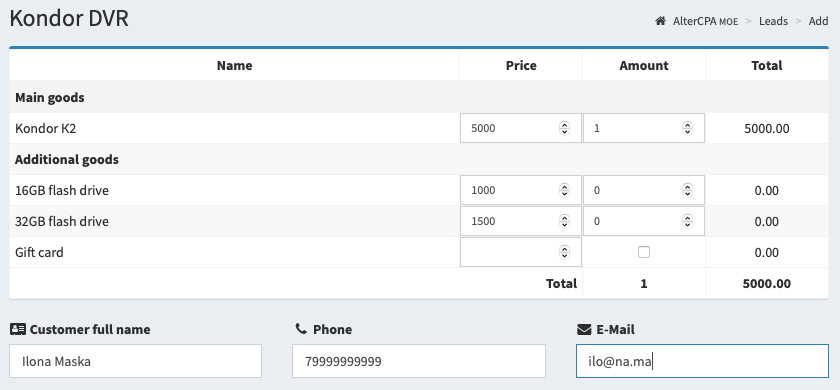
Some features of the form:
- Prices for goods will change automatically when you select the desired country. You should change prices manually only if you have agreed it with the merchant.
- The order and affiliate ID in the agency correspond to the UID and SRC fields from the list of leads, you can build statistics of external tags based on them.
- The form uses your own IP-address and User-Agent, do not forget to change them to the actual ones if necessary.
- Only the phone, IP address and order ID fields are required, but the customer's name is also recommended.
Sending leads via site form
In the offers section you can download a ready-made file for sending leads. To successfully attach this file to your site you should correctly configure the form.
- The action parameter of the form must have the order.php value
- The method parameter of the form must have the post value
The fields in the form must have the following names:
- name — customer's name
- phone — customer's phone number
- email — customer's email address
- comment — arbitrary comment to the order
- params[xxx] — custom field with xxx name.
- utm_source, utm_campaign, utm_content, utm_term, utm_medium — corresponding UTM tags
Other fields from the form are not automatically picked up by the file because they are not particularly needed in real work.
<form action="order.php" method="post">
  <input type="text" name="name" />
  <input type="tel" name="phone" />
  <button type="submit"></button>
</form>
Sending leads via API
You have two API functions available for working with leads — adding a new lead and checking the status of leads using a list of their identifiers. API documentation is presented in the corresponding section but we will note the most important:
- When sending leads, you really need to send the offer ID, customer name and phone number, customer's IP address. The order ID on your side can be passed as "auto". All other fields are optional.
- When checking leads, you need to specify a list of your OWN order identifiers, not system ones. You pass these identifiers to the id field when you send leads or get them from the uid field (not id!) when using "auto".
Statistics
According to different parameters, several sections of statistics are available to you:
- Leads by date and hour: shows statistics in the context of the lead time.
- Leads by offer: analyzes statistics by offer.
- Leads by country: statistics by countries indicated by the lead.
- UTM tags: statistics in the context of standard UTM tags.
- External tags: statistics in the context of your order ID and source tags.
The composition of statistics reports is described in the corresponding section.
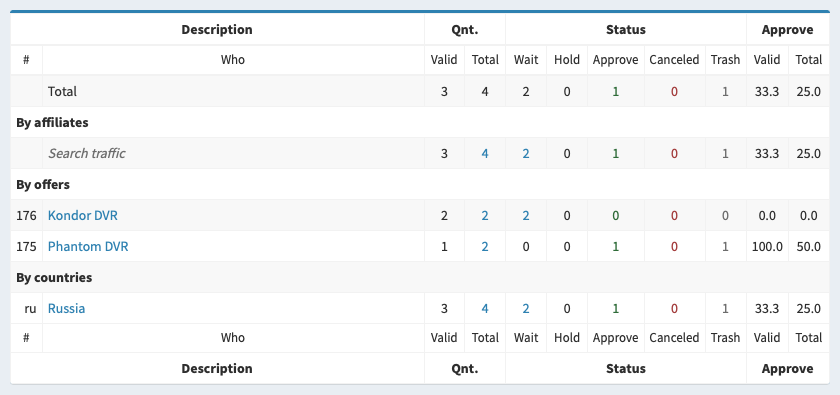
A summary report of lead analytics is also available to you. A breakdown by offers, countries and your sources is immediately available there. It is also described in the corresponding section.
Postbacks
You specify postbacks yourself in "Postback" subsection of "Traffic" section or send them to your merchant. Global postbacks can be set either for all statuses or separately for the "Processing", "Hold", "Approve", "Cancel" and "Trash" statuses. In addition to global postbacks, you can also use additional postbacks linked to specific offers and statuses.
You can use following macros in the postback:
- {uid} — your order ID
- {src} — your source ID
- {id} — order ID on the platform side
- {offer} — offer ID
- {ip} — customer IP-address
- {geo} — customer country, two-letter ISO code
- {stage} — symbolic order status (list below)
- {reason} — refusal reason code (list below)
- {price} — total order price
- {utm_source}, {utm_campaign}, {utm_content}, {utm_medium}, {utm_term} — UTM tags
Order status can take the following values:
- wait – order processing is in progress
- hold – hold
- approve – order is approved
- cancel – order is cancelled
- trash – order is cancelled as trash
The reason for the cancellation can take the following values:
- 1 – Incorrect phone (trash)
- 2 – Changed his mind
- 3 – Did not order (trash)
- 4 – Requires certificate
- 5 – Wrong GEO (trash)
- 6 – Errors or fakes (trash)
- 7 – Duplicate order (trash)
- 8 – Ordered elsewhere (trash)
- 9 – Expensive
- 10 – Not satisfied with delivery
- 11 – Could not get through (trash)
- 12 – Possibly fraud (trash)
- 13 – Speaks different language (trash)
- 14 – Product did not fit (trash)
- 15 – Offer is disabled